Home About Me Privacy Policy
Showing posts with label Holidays. Show all posts

Freddie's Adventures (Our Elf)

It's amazing how time flies! When I get busy, unfortunately blogging is the first thing that gets pushed aside. I love it, so I don't want to give it up, but I have to give a little somewhere. Peppers Pickins has been busy, though, so that's exciting!

We are getting into the Christmas spirit around here, and one of the ways my boys do that is through the magical travels of their elf, Freddie. I have found some great resources to help brainstorm ideas for his daily hangouts, which you can see on my Pinterest page. Some of our ideas began with the ideas of others, and why not?! We do this about 25 days each year, and it gets a little hard to continue to be original. Let's help each other out!!
Freddie with the Baby Jesus
Last year I put him with the Little People Nativity set, and that was the first time Brady decided to touch him. It wasn't the last time Freddie's been touched, either! Only by Brady, though... Jax is too scared to break the rules :)
It's tons of fun for the boys, but I have to admit, it's fun for Ryan and me, too! So far, he's delivered hot chocolate and fixin's the morning he arrived (Last year, when Freddie first arrived, he came in his box with the book. He also brought back the book for the boys to read and remember the rules for this year.), rode on one of the boys' stuffed animals, read a Christmas book in the playroom recliner, decorated the Christmas tree with the boys' undergarments (That was a hit!), peeking out of a stocking, sitting up on a ladder, and more. I try to change it up each night between nice and fun. No matter what Freddie is doing, the boys are always excited to search and find him each morning.
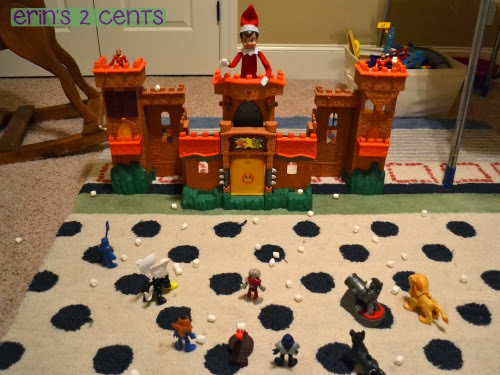
Freddie had a marshmallow fight with the Imaginext castle men we received from Fisher Price through House Party. He won!
Freddie was caught in action with a marshmallow in his hand!
Here's another mischievous deed from Freddie. He found one of our dry erase markers and gave the boys some new portraits. They loved that one!
I can't wait to continue to see where Freddie goes next! I hope you're having as much fun with your elf as we are. Please feel free to share your elf experiences or links to your pages with ideas.

Saddle Up, Cowboy!

My oldest son, Jackson, just turned six and to celebrate, we had a cowboy birthday party. We don't do a big party every year, so when we do, I let them choose the theme. Brady just had a Diego party in the spring that was a lot of fun. Jackson decided about that time that he wanted a cowboy party. So of course, I turned to Pinterest to get ideas.

To get everyone in the mood, you have to start with a great invitation. I found the best resource to make you're own cards here. I then had to use the option to turn it into a PDF and copy and paste it into word to make it the right size for printing correctly.
And now for the party!

Go Diego Go! Birthday Party

We had the best time at Brady's birthday party. I planned for it to be outside, so of course there was a chance for showers on the day of the big event. We waited until the last possible moment to set up, so I ran out of time to take pictures before our guests arrived. Luckily, Ryan was on photographer duty and did a good job. I'll share the pictures I have and the fun details for our Diego Fiesta!
Our budget is tight, so I had to do the best that I could with as little money as possible (which I normally do anyway). The first thing I did was make binoculars out of toilet paper rolls and yarn. I saved the empty rolls from our house and also asked if they could save them for me at work. I hot glued two tubes together and punched holes to tie the string.
I made Diego vests out of paper bags. Publix was nice enough to give me those. I printed the logo from the NickJr.com site. My mom was a huge help with all of the diy projects. So far, my total is $0!
I scoured my favorite place for ideas, Pinterest, and there was a great example for games at Amanda's Parties To Go. I used a tarp and pallet slats to create an alligator swamp and brought home toy alligators from work.
They're lined up and ready to go!
They had to swing over a pool of quicksand, which was made with paper bags. I delegated the creation of the quicksand to my dad, and his idea was just to throw the pile of bags under the bar! Again, still at $0.
This led them to climb into the Animal Rescue Center (our playhouse), use their binoculars to find trapped butterflies, and go down the slide to save them.  The butterflies were "trapped" in the fencing around our vegetable garden. Unfortunately, there are no pictures of this part, because the kids were so excited about catching the butterflies, they did it as they were arriving! I got three nets at the Target dollar bins and the butterflies from the Dollar Tree. The cost is now at $8.
The food and drink spread I kept pretty simple. It was an afternoon party, so I served finger foods. I typically try to keep the food somewhat healthy, since I know they'll be getting their sugar kick with the cake. We had "Baby Jaguar Juice" (lemonade), "Alicia's Apples," "Bobo Brothers' Bananas," and "Animal Rescue" animal crackers. I made little tags for each on cardstock using clipart of each character. For protection, I laminated them. I also served bottles of water with labels that had Baby Jaguar on them. Here's the best picture I could find of the set up.
I'm not sure how much the food cost, because my parents picked it up for me, and my dad has this bad habit of losing the receipt. Can I count that as free? The decorations for the tables included table covers from the Dollar Tree (the paw print on the black table was wrapping paper), a Diego stuffed animal that we found at a yard sale for $4, blow-up trees and animals that I had from my old classroom decorations and the Dollar Tree, and balloons from Party City. That cost me $12, bringing the total up to $20 if you let me count the food as free :)
The cupcakes were from Sam's Club, and they were yummy! Unfortunately, we didn't get a picture of them before we started passing them out. They were really cute with Diego toppers I made with paper punches, toothpicks, and printouts from NickJr.com. I bought the punches, but I don't count those as an expense, since I'll use them for other crafts. The cupcakes were $14, plates and napkins $4, so that's up to $38.
For the favors, I wanted to make Rescue Pack and fill it with goodies. I like to try to find something the kids will actually use once or twice. I know when my kids get home from parties, most of the stuff ends up in the trash pretty quickly. Dollar Tree did it again! They had orange bags that were perfect for Rescue Pack. I printed off the eyebrows, eyes, and mouth using yellow, white, and red card stock. Tacky glue worked the best for attaching them. I found some Diego and Dora stickers and pretty cool bug kits at the Dollar Tree to use as favors. My boys have used ours, so I hope that our guests have found some use of them. The cost of this was hard to calculate, because RSVPing must be seen as unnecessary these days. Each favor cost $2.33. I will be returning the unused products.

Overall, I think the party was a great success, and the kids had a lot of fun. Happy Birthday to my little guy!


Sundays
Bouquet of Talent
Mondays
Make It Pretty Monday
Tuesdays
Tuesday’s Treasures
yourimagetitle
From Dream to Reality
Twirl & Take a Bow
Wednesdays
Your Creative Timeout
Under $100 Link Party
Pinterest Power Party
Penny Pinching Party
Whimsy Wednesday
Real Family Fun
Adorned From Above Blog Hop
Thursdays
The Weekly Creative
Tutorials, Tips, and Tidbits
Think Tank Thursday
Fridays
Freedom Fridays
Inspiration Spotlight
Saturdays
Your Great Idea
Sunday Scoop

Brady's Birthday Planner and Invitation

I feel like I was just creating the heading for Brady's 3rd birthday. Boy, how time flies!

I am really excited about this year, because we are having a birthday party for him and his preschool friends. He chose Diego as his theme. To be honest, he chose Dora and was highly encouraged to go with Diego!

What to Do With The Christmas Cards?

After Christmas every year, I take down the Christmas cards and look at the beautiful pictures of all of our family and friends.  Then I wonder what I should do with them and feel guilty when they end up in the trash.  No more guilt this year!
I searched {Pinterest} for ideas, and created a mix of my own.  I wanted to keep it short and simple, so I used a chicken ring to collect all of the cards on.  I don't know what the technical term is for them, but they are the rings that open and latch back together.  They are usually found in the office supply section.  Each card got a hole punch in the corner, and then I threaded them on the ring.  I made a card out of scrap card stock to add the year.  
I took it a little further and included many cards throughout the year.  Birth and wedding announcements and special cards from birthdays and holidays seemed to be a great addition to the Christmas cards.
Now we can flip through each year to see how our friends and families have grown and changed.  I also made sure to include our Christmas card at the very end so that we can compare them from year to year.
What do you do with your holiday cards?

I hope everyone has a happy and healthy new year!  I look forward to sharing more of our projects and strategies for saving with you.


Visit {HERE} to see the link parties where you will most likely find me.  Thanks to all of the wonderful hosts!

Christmas Decor Around Our House

I hope everyone is having a great holiday season so far!  We have a lot going on around our house.  My in-laws are visiting from Massachusetts.  We're doing some of our traditional events.  The tree has been decorated as we listen to the Chipmunks Christmas CD.  Last night, we went to Krispy Kreme to get the Christmas donuts and then look at the Christmas lights around the city.  And I've finally gotten around to taking pictures of the house and posting them.  Better late than never!  Some of these you could even throw up tonight if you want to add to your festivities.
This nativity scene is set up in our dining room up high so that the boys can't reach the glass pieces.  I received it from my grandmother.  The boys still figured out they can reach it with chairs and play with the set.  I'll keep my fingers crossed that it all stays in tact!  They even have their own Little People set in their playroom, but I guess it's more fun to play with when Mommy doesn't want you to :)

In the dining room, I added these red glass ornaments that were passed down to us from Ryan's mom.  It was very simple but adds so much to this section of the room.
I did the same in the kitchen with fishing line and colored ornaments.
On our bar, I simply took a basket, used tissue paper to fill it, and then laid the red ornaments on top.  This simple trick made the ornaments visible.
This year, I decided to set up a little coffee spot.  This makes the mugs easily accessible for our guests who might not know where to find them.  It also adds a little more color to the counter tops.
While these are not all of the decorations I have, they are some of my favorites.  I hope you all have a wonderful Christmas and enjoy any other holidays you may celebrate!

Sending Packages the Easy Way

For Christmas, I had to send packages to my brother and brother-in-law's families.  Our post office is not the most convenient to get to, and now that I'm back working, I really don't have a convenient time to go.
I already knew you could print out shipping labels online, so I did a little more investigating.  You can actually set up a pick-up for your mail carrier!  I went to the USPS website, and there is a tab for setting it up.  You pick the day and the place they will collect the packages.  I chose the front door, but they had multiple choices and a place for any notes you need to leave them.  I left the boxes out, and they were gone when I got home from work!  We were a little skeptical and wondered if someone else decided to pick them up, but we got a confirmation e-mail from the post office the next day saying that they picked up the boxes.
I also did a little comparing between the flat rate boxes and using your own.  For my brother's presents, it was better to send it in my own package, because I couldn't fit one box into the small flat rate box.  If I could have, it was the same price.  My brother-in-law's package was going to be about the same either way.  You have to weigh the packages in order to print out shipping labels for non-flat rate boxes.  I used our food scale to do this.
This little discovery definitely made my holiday season a little easier!

PDF Print