Home About Me Privacy Policy
Showing posts with label Decorating. Show all posts

Burlap Curtains for the Kitchen

Our kitchen has a great big window in the eating area, and I knew I wanted curtains that only covered the top portion. I've been on a burlap kick and saw some cute ideas to use burlap sacks as curtains. Luckily, I found some coffee sacks at a local antique mall.

What you will need:
  • burlap sack (maybe more, depending on the width of your window)
  • scissors
  • curtain rod
  • curtain rings with clamps

To make them:
  1. Pull or cut the twine holding the two sides of the sack together, creating one long piece. From there, I was able to cut it into four equal pieces.
  2. To cut, measure your length out on the sides. Take into account any wording or pictures on the sacks.
  3. Find a spot in between two of the strands. Cut through in between those strands. Your curtains won't be perfectly straight, but this will prevent them from falling apart and having little strings hanging off of them.
  4. Hang a curtain rod above your window.
  5. Use rings with clamps to attach the burlap. Three on each piece worked for me.

You now have a beautiful and simple window treatment!

A Dresser Make-Over

Someone was asking at work what I've been posting about recently, and I told her I hadn't been on here since before Christmas. She said that didn't sound like me, so I figured I better get back to posting!
We have a little nook off of the great room into the master bedroom. The plan was to move our fish tank from the bedroom to here, but I wanted to paint the dresser intended to hold it. Our fish tank wasn't looking so pretty anymore, and we were lucky enough to be offered a free fish tank from Brady's preschool teacher. This meant I had to kick it into high gear and get the dresser ready.

Using Clip Boards to Display Art

Any mom of an elementary school-aged child knows how much stuff comes home in their child's backpack. If you're like me, it's very hard to part with even the simplest of items. But I also don't like the paper clutter! It's a very crazy internal battle.

Jackson went to an art camp this summer after just receiving his art portfolio at the end of the school year, so I really had a lot of his work sitting around with no place to go. I do have a system to save the boys' work that I adapted from Iheart Organizing, but I also want to display some of it. I had seen some cute ideas, but they were too much work. For me, time is a major factor in everything, because I don't have it!

An Old Suitcase

My mom and I seemed to be ahead of the repurposing phase and just didn't realize how popular that would become. 
For the boys' changing table, I transformed the dresser above so that could it could be reverted back. The changing pad sat on top, and there was enough room at the end for a basket to organize the diaper accessories. Eventually, I am going to make into a tv stand for our den/guest room. It's getting a lot of use!

New Old Dresser

This dresser was a fun, quick transformation. The boys' clothes are getting too big to fit into the little drawer systems I have in their closets, so I decided to get a dresser for them. I was very picky in my expectations. I wanted four drawers that all were exactly the same size. I also prefer antiques. I never thought I would find one, especially in our price range. I had to decide if I was going to wait around until I found one that fit my description or if I try to find something new that would make do.

Bath Towel Holder Complete!

Just in time for Ryan's parents to visit, I finally hung up the towel holder I made with old bath knobs! If you missed the post where I first shared it, visit here. Just to recap, our bathroom towel bar is across from the shower over the toilet, requiring someone to have to get out of the shower to get their towel (one of my pet peeves!). I wanted a hanger closer to the shower to prevent this from happening.

Here's a close-up of it. Please keep in mind that I don't have the best lighting for pictures in here!

Yard Sale Finds #3

This weekend was a LONG one. Jackson had a baseball tournament that started with one game Friday evening, starting back at the ball fields Saturday morning at 8:30, and leaving around 5:00. With that being said, it was a GREAT day! Their team was definitely the underdog. They only had 7 players, and in their league, all players get to go on the field and bat, so the other teams had at least 10. Their team came in 3rd place! The boys were awesome!!
Now that I'm done bragging, I'll share my fun finds from the weekend. Down here in Alabama, they start the yard saling on Friday. Luckily, with my summer hours, I can go! Not much luck, though, and nothing on the ones I could squeeze in Saturday. 
I got two purses, a Coach and Talbots, for $11.
One of the thrift stores nearby was having their 50% off sale; that's where I really had the luck. I got all of this for $10.50!
Most of these are self-explanatory, but I will say something about a few. 
The fan blades are for a cute idea I saw on Pinterest. Blue Velvet Chair posted the cutest dragonflies, and eventually, I want to deck out the boys' area in the backyard. This would be a perfect addition, and the set of fan blades were $2. I couldn't pass it up!
I also got what looks like a magazine rack, but there are endless possibilities for storage. It needs a coat of paint, so now the decision is whether to redo it in black or pick a fun color.
I have no idea what the square metal frame is. I'm thinking it held something together that was screwed into the brackets. I'm not quite sure where I'm going with that one, but right now, I'm picturing some kind of art work to go out on our back patio. Let me know if you have any awesome ideas that jump out at you!
I hope you had better luck this weekend than me.

New Front Patio

I am so excited to share this post with you, because it means I am finally done! Almost...
Our old house had an awesome front patio on it, and I loved sitting out there on perfect nights. The house we are now living in doesn't have one. It has a sidewalk that leads to the front door. Of course, I decide to tackle adding a front patio the diy way. All we paid for were the plants that are in between the stones.
Here's a picture from last Independence Day. All that's next to the sidewalk is mulch and bushes.
We found this gem of a place to get rock for free. We load up in my Dad's truck, climb all over this side of a mountain (We're in Alabama, so it's more like a big hill.), and collect all kinds of rocks. We lined our front beds with little ones, and we also found large flat ones for me to make the patio. Ryan also loaded up a wheelbarrow with leftover sand from construction down the street. We have really become resourceful!
Jackson helping out
We had to transplant some bushes that were in the spot, and then we spread the sand out. Because the stones were of varying thickness, it took a little ingenuity to get them all level. We laid them out first to get the right fit. It was kind of like putting a puzzle together. Then, I just started from the sidewalk and worked my way around digging up the spots for each rock. Ryan didn't have the patience for the leveling, so I really did take this one on myself. (Don't worry, I found other projects for him to do!) The biggest trick I found was to make sure that once each rock was level, I made sure to fill in any holes underneath. This keeps them from wiggling.
The rocks don't have a flat surface, so if that's what you're looking for, I would recommend purchasing flagstone. We added ground cover plants in between the rocks to eventually grow in and keep the rocks from shifting.
I added a table set that my mom had, and that's my almost part. Now that needs to be power washed and painted. Slowly but surely!
We've also added some decorations from my grandmother around our front windows. She and I don't know what they are, but they're pretty! It just adds a little something more. You can also see where we transplanted one of the bushes.
Here's the front entrance now.
My favorite part is the sign we added by the front door. I picked this up from a vendor at Randolph School's Under the Christmas Tree.
I can't wait to to sit on our front porch on one of these nice spring nights!


Bouquet of Talent Suburbs Mama Sunday Link Party Make It Pretty Monday Tuesday’s Treasures yourimagetitle From Dream to Reality Twirl & Take a Bow Brag About It Your Creative Timeout Under $100 Link Party Pinterest Power Party Penny Pinching Party Whimsy Wednesday Real Family Fun Adorned From Above Blog Hop Tutorials, Tips, and Tidbits Think Tank Thursday Freedom Fridays Inspiration Spotlight Your Great Idea Sunday Scoop All Things Pretty Pinterest Blitz Pin It Tuesday

Go Diego Go! Birthday Party

We had the best time at Brady's birthday party. I planned for it to be outside, so of course there was a chance for showers on the day of the big event. We waited until the last possible moment to set up, so I ran out of time to take pictures before our guests arrived. Luckily, Ryan was on photographer duty and did a good job. I'll share the pictures I have and the fun details for our Diego Fiesta!
Our budget is tight, so I had to do the best that I could with as little money as possible (which I normally do anyway). The first thing I did was make binoculars out of toilet paper rolls and yarn. I saved the empty rolls from our house and also asked if they could save them for me at work. I hot glued two tubes together and punched holes to tie the string.
I made Diego vests out of paper bags. Publix was nice enough to give me those. I printed the logo from the NickJr.com site. My mom was a huge help with all of the diy projects. So far, my total is $0!
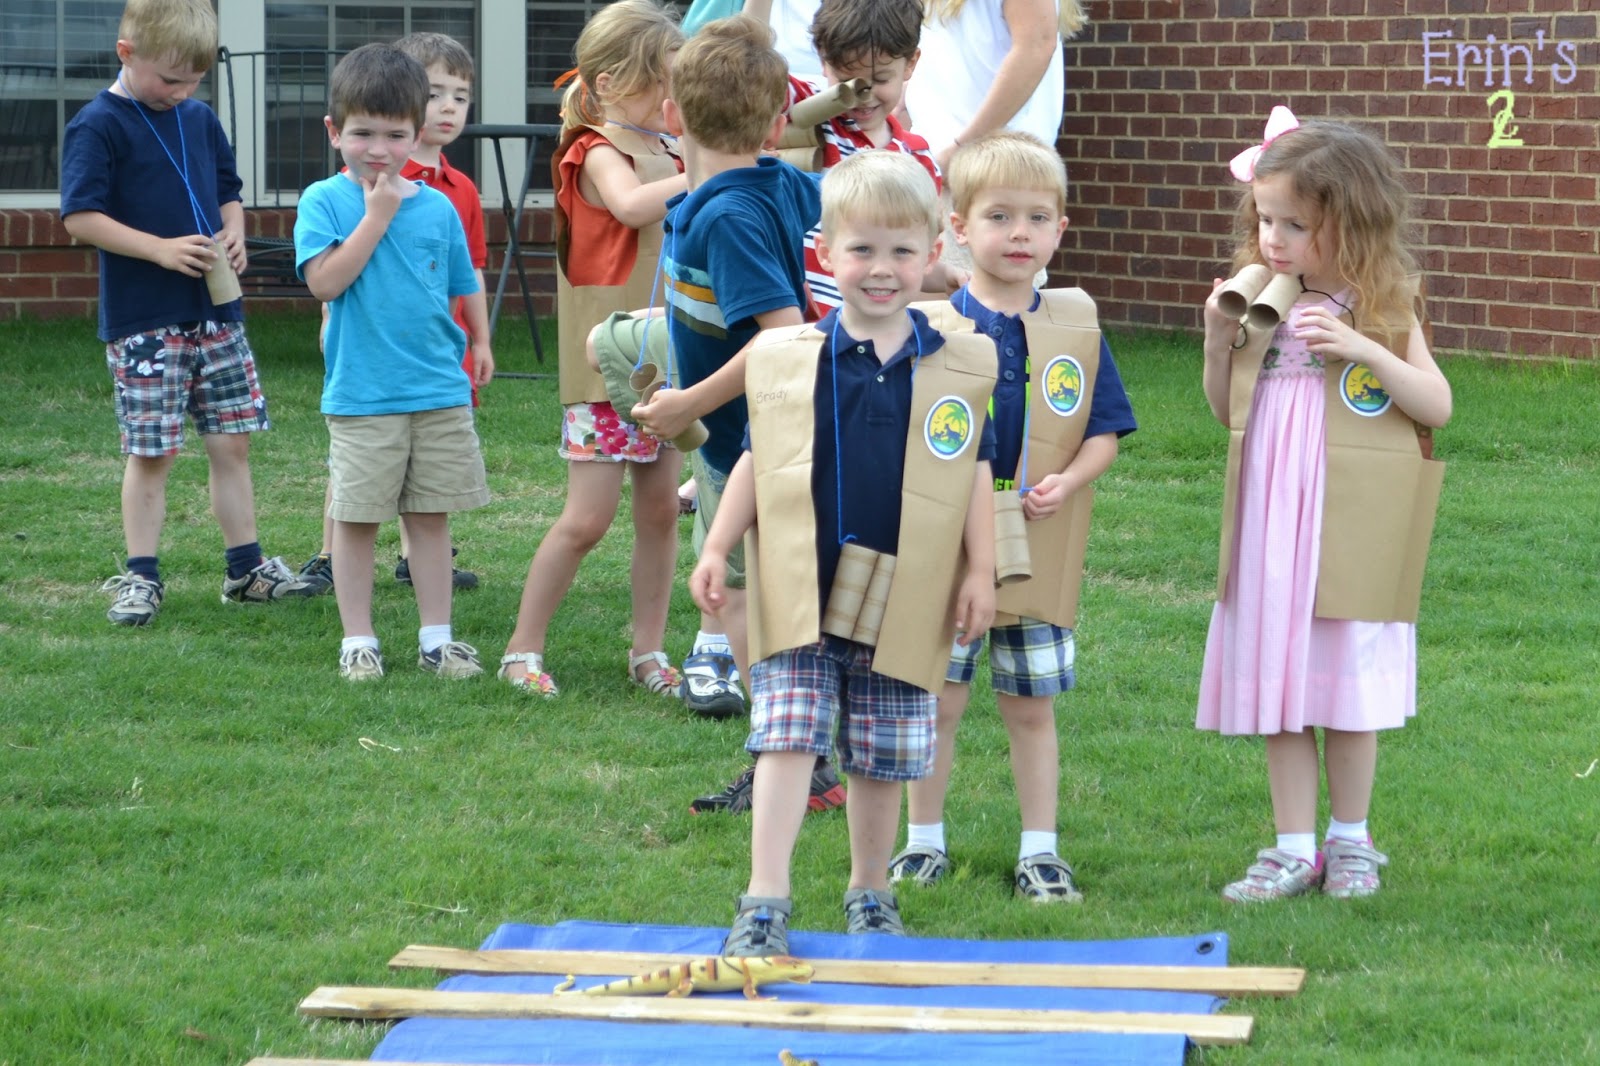
I scoured my favorite place for ideas, Pinterest, and there was a great example for games at Amanda's Parties To Go. I used a tarp and pallet slats to create an alligator swamp and brought home toy alligators from work.
They're lined up and ready to go!
They had to swing over a pool of quicksand, which was made with paper bags. I delegated the creation of the quicksand to my dad, and his idea was just to throw the pile of bags under the bar! Again, still at $0.
This led them to climb into the Animal Rescue Center (our playhouse), use their binoculars to find trapped butterflies, and go down the slide to save them.  The butterflies were "trapped" in the fencing around our vegetable garden. Unfortunately, there are no pictures of this part, because the kids were so excited about catching the butterflies, they did it as they were arriving! I got three nets at the Target dollar bins and the butterflies from the Dollar Tree. The cost is now at $8.
The food and drink spread I kept pretty simple. It was an afternoon party, so I served finger foods. I typically try to keep the food somewhat healthy, since I know they'll be getting their sugar kick with the cake. We had "Baby Jaguar Juice" (lemonade), "Alicia's Apples," "Bobo Brothers' Bananas," and "Animal Rescue" animal crackers. I made little tags for each on cardstock using clipart of each character. For protection, I laminated them. I also served bottles of water with labels that had Baby Jaguar on them. Here's the best picture I could find of the set up.
I'm not sure how much the food cost, because my parents picked it up for me, and my dad has this bad habit of losing the receipt. Can I count that as free? The decorations for the tables included table covers from the Dollar Tree (the paw print on the black table was wrapping paper), a Diego stuffed animal that we found at a yard sale for $4, blow-up trees and animals that I had from my old classroom decorations and the Dollar Tree, and balloons from Party City. That cost me $12, bringing the total up to $20 if you let me count the food as free :)
The cupcakes were from Sam's Club, and they were yummy! Unfortunately, we didn't get a picture of them before we started passing them out. They were really cute with Diego toppers I made with paper punches, toothpicks, and printouts from NickJr.com. I bought the punches, but I don't count those as an expense, since I'll use them for other crafts. The cupcakes were $14, plates and napkins $4, so that's up to $38.
For the favors, I wanted to make Rescue Pack and fill it with goodies. I like to try to find something the kids will actually use once or twice. I know when my kids get home from parties, most of the stuff ends up in the trash pretty quickly. Dollar Tree did it again! They had orange bags that were perfect for Rescue Pack. I printed off the eyebrows, eyes, and mouth using yellow, white, and red card stock. Tacky glue worked the best for attaching them. I found some Diego and Dora stickers and pretty cool bug kits at the Dollar Tree to use as favors. My boys have used ours, so I hope that our guests have found some use of them. The cost of this was hard to calculate, because RSVPing must be seen as unnecessary these days. Each favor cost $2.33. I will be returning the unused products.

Overall, I think the party was a great success, and the kids had a lot of fun. Happy Birthday to my little guy!


Sundays
Bouquet of Talent
Mondays
Make It Pretty Monday
Tuesdays
Tuesday’s Treasures
yourimagetitle
From Dream to Reality
Twirl & Take a Bow
Wednesdays
Your Creative Timeout
Under $100 Link Party
Pinterest Power Party
Penny Pinching Party
Whimsy Wednesday
Real Family Fun
Adorned From Above Blog Hop
Thursdays
The Weekly Creative
Tutorials, Tips, and Tidbits
Think Tank Thursday
Fridays
Freedom Fridays
Inspiration Spotlight
Saturdays
Your Great Idea
Sunday Scoop

PDF Print